

Introduction
In today’s fast-paced world, even minor tech issues can disrupt your workflow and productivity. Whether it’s a stubborn software glitch, connectivity problems, or device errors, these challenges can feel overwhelming—especially when time is of the essence.
Let’s tackle these challenges together and make IT simple, one step at a time!
1. How to Optimize Storage Space on Your Device
Freeing up storage improves performance. Here’s how to do it:
1. Clear Out Unnecessary Files
Over time, we accumulate files we no longer need, like downloads, duplicates, and temporary files. Here’s how you can clear them:
On Windows Computers:
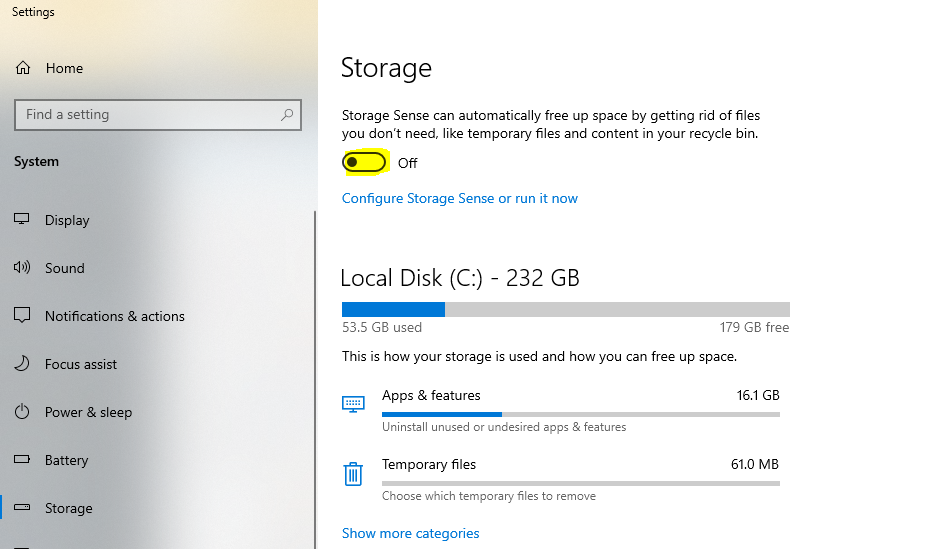
- Use Storage Sense:
- Go to “Settings > System > Storage.”
- Turn on “Storage Sense” to automatically delete temporary files and items in the Recycle Bin.
- Manually Clear Downloads:
- Open “File Explorer.”
- Navigate to “Downloads.”
- Select and delete old files you no longer need.
On Mac Computers:
- Use Storage Management Tools:
- Go to “Apple Menu > About This Mac > Storage > Manage.”
- Review categories like “Documents,” “Downloads,” and “Trash,” and delete unnecessary files.
- Empty the Trash:
- Right-click the “Trash” icon and select “Empty Trash.”
2. Uninstall Unused Apps
Apps you no longer use can consume significant storage space.
On Windows:
- Go to Settings:
- Click “Settings > Apps > Apps & Features.”
- Uninstall Programs:
- Find the app, click on it, and select “Uninstall.”
On Mac:
- Use Finder:
- Open “Finder > Applications.”
- Move to Trash:
- Drag the unused app to the Trash.
- Empty the Trash to free up space.
3. Use Cloud Storage for Large Files
On Windows/Mac:
- OneDrive, iCloud, or Dropbox:
- Move large documents, videos, or backups to the cloud.
- Access them online instead of storing them locally.
4. Regular Maintenance
Schedule monthly maintenance to:
- Review and delete old files.
- Uninstall apps you no longer use.
- Clear app caches and downloads.
2. How to Prevent Overheating in Laptops and Desktops
Common Causes of App Crashes
App crashes can occur for several reasons:
- Outdated Software: Apps or operating systems that are not updated can cause compatibility issues.
- Corrupt Files: Damaged or missing app files can lead to crashes.
- Insufficient System Resources: Low RAM, CPU overload, or low storage space can crash apps.
- Malware and Viruses: These can interfere with app performance.
- Software Conflicts: Third-party applications may conflict with the app you are using.
- Hardware Issues: Faulty RAM or hard drives can also cause app instability.
Differences Between Windows and Mac Crashes
While Windows and macOS share some common causes for crashes, there are slight differences:
- Windows: Windows apps may crash due to issues like driver conflicts, registry errors, or system file corruption.
- Mac: On macOS, crashes may occur due to permission issues, NVRAM corruption, or macOS-specific software conflicts.
Understanding these distinctions helps in applying the right solutions for each platform.
Basic Troubleshooting Steps
Before diving into specific solutions, try these universal troubleshooting steps:
- Restart Your Device: Many issues can be resolved with a simple restart.
- Close Other Applications: Free up system resources by closing unnecessary apps.
- Check System Requirements: Ensure the app meets the system requirements.
- Check for Updates: Update both the app and the operating system.
- Check for Error Messages: Note any error codes or messages for further diagnosis.
If these steps don’t solve the problem, proceed with the platform-specific solutions below.
How to Fix Apps Crashing on Windows
1. Update the Application
Outdated apps can often crash due to compatibility issues.
- Open the app.
- Go to Help or Settings.
- Check for an Update option.
- Install any available updates.
2. Check for System Updates
Ensure Windows is up-to-date.
- Go to Settings > Update & Security > Windows Update.
- Click Check for Updates.
- Install any available updates and restart your computer.
3. Run the App as an Administrator
Running the app with administrative privileges can resolve permission issues.
- Right-click on the app shortcut.
- Select Run as Administrator.
4. Check for Compatibility Issues
If the app is old, it may need compatibility adjustments.
- Right-click the app icon.
- Select Properties > Compatibility.
- Select a suitable Windows version and hit Apply.
5. Repair or Reinstall the Application
Corrupt app files may cause crashes.
- Go to Settings > Apps > Apps & Features.
- Select the problematic app.
- Click Modify or Uninstall.
- Follow the prompts to repair or reinstall the app.
6. Clear Temporary Files and Cache
Too many temporary files can cause performance issues.
- Press Windows + R, type %temp%, and hit Enter.
- Delete all files in the folder.
7. Scan for Malware or Viruses
Malware can interfere with applications.
- Open Windows Security.
- Go to Virus & Threat Protection > Quick Scan.
8. Check for Faulty Drivers
Outdated drivers can cause crashes.
- Open Device Manager.
- Right-click problematic devices and choose Update Driver.
9. Use System File Checker (SFC) Tool
Corrupt system files can crash apps.
- Open Command Prompt as Administrator.
- Type
sfc /scannowand press Enter.
How to Fix Apps Crashing on Mac
1. Check for App Updates
Ensure your app is updated.
- Open the App Store.
- Go to Updates and install any available updates.
2. Update macOS
Keeping macOS updated helps maintain stability.
- Go to System Preferences > Software Update.
- Click Update Now.
3. Force Quit and Relaunch the App
Sometimes, a force quit helps.
- Press Command + Option + Escape.
- Select the app and click Force Quit.
4. Reset the NVRAM and SMC
Corrupt settings can cause crashes.
- Shut down your Mac.
- Power it on and quickly hold down Option + Command + P + R simultaneously.
5. Clear App Cache and Preferences
- Open Finder and press Command + Shift + G.
- Enter
~/Library/Cachesand delete relevant cache files.
Advanced Troubleshooting for Windows and Mac
Checking Crash Logs
On Windows:
- Go to Event Viewer > Windows Logs > Application.
On Mac:
- Open Console to check logs.
Running in Safe Mode
Safe Mode disables third-party software.
Monitoring System Performance
Use Task Manager (Windows) or Activity Monitor (Mac) to check resource usage.
How to Fix the “Blue Screen of Death” (BSOD) on Windows

The infamous Blue Screen of Death (BSOD) is one of the most dreaded errors encountered by Windows users. When it happens, your system abruptly crashes and displays a blue screen filled with cryptic error codes, often leaving you confused and frustrated. But don’t panic—BSOD errors are fixable! In this guide, you’ll learn what causes the BSOD, how to troubleshoot it, and how to prevent it from happening again.
What is the Blue Screen of Death (BSOD)?
The Blue Screen of Death (BSOD) is a stop error that forces your Windows operating system to shut down unexpectedly to protect the system from damage. The blue screen usually displays an error code, some technical information, and a message indicating the reason for the crash.
BSOD errors can occur in any version of Windows, from Windows XP to Windows 11. Although modern systems have become more stable, BSODs still occur due to hardware faults, driver issues, or software conflicts. Knowing how to identify and resolve these issues is essential for keeping your computer running smoothly.
Common Causes of BSOD
Before jumping into the solutions, it’s important to understand what might be causing the BSOD.
- Faulty Hardware: Issues with RAM, hard drives, or graphics cards can lead to system crashes.
- Outdated or Corrupted Drivers: Drivers enable communication between the operating system and hardware. Outdated or corrupted drivers can trigger a BSOD.
- Malware and Viruses: Infections can corrupt system files or hardware drivers.
- Overheating: Excessive heat can damage hardware components, causing your system to crash.
- Software Conflicts: Conflicting programs or incompatible software can interfere with system processes.
- System File Corruption: Missing or corrupted system files can destabilize Windows.
- Power Issues: Unexpected shutdowns or power surges can damage files or hardware components.
Identifying the root cause will help you choose the right fix for the BSOD.
Identifying the Error Code
When a BSOD appears, it typically displays an error message and a code (e.g., 0x0000007B, CRITICAL_PROCESS_DIED, or MEMORY_MANAGEMENT). These codes give clues about the underlying issue.
How to Identify BSOD Codes:
- Note the Code on the Screen: Take a picture or write down the error code.
- Use Event Viewer:
- Go to Start > Search and type “Event Viewer”.
- Navigate to Windows Logs > System.
- Look for entries labeled as Error or Critical to find BSOD events.
- Use Third-Party Tools: Tools like BlueScreenView can analyze crash dumps and identify the cause.
Once you know the error code, search for it online or in Microsoft’s documentation to get specific troubleshooting steps.
Step-by-Step Fixes for BSOD
1. Restart Your Computer
Sometimes, the simplest solution is the best one. A quick restart can clear temporary issues or glitches causing the BSOD.
- Press and hold the power button until your computer turns off.
- Wait a few seconds and switch it on again.
- See if the BSOD persists.
If the problem is temporary, your computer might boot normally.
2. Check for Windows Updates
Outdated system files can cause BSOD errors. Keeping your Windows system up-to-date can often resolve these issues.
- Go to Settings > Update & Security > Windows Update.
- Click “Check for updates”.
- If updates are available, let them download and install.
- Restart your computer after installation.
Windows updates often include patches for known bugs, driver updates, and security fixes.
3. Run a System Restore
System Restore allows you to roll back your computer to a previous state before the BSOD occurred.
- Press Windows + R, type “rstrui”, and press Enter.
- Follow the prompts to select a restore point.
- Confirm and let Windows restore your system.
This method can resolve BSOD errors caused by recent changes in software or settings.
4. Scan for Malware and Viruses
Malware can corrupt system files and drivers. A thorough scan can help you identify and remove any malicious software.
- Open Windows Security (or your antivirus program).
- Click “Virus & threat protection”.
- Select “Quick scan” or “Full scan” for a detailed investigation.
- Remove any detected threats and restart your computer.
5. Check Hardware and Drivers
Faulty hardware or drivers often lead to BSOD errors. Perform these checks:
- Disconnect External Devices: Unplug USB devices, printers, and peripherals to see if one of them is causing the issue.
- Run Memory Diagnostics:
- Press Windows + R, type “mdsched.exe”, and press Enter.
- Follow the prompts to check your RAM.
- Check Hard Drive Health: Use tools like CrystalDiskInfo to monitor drive status.
Advanced BSOD Fixes
If the basic solutions don’t resolve the issue, it may be time to try more advanced troubleshooting methods. These techniques often require a deeper understanding of system components, but they can effectively address persistent BSOD errors.
1. Update or Reinstall Drivers
Outdated or corrupt drivers are one of the most common causes of BSOD errors. Updating or reinstalling them can sometimes fix these issues.
- Open Device Manager:
- Press Windows + X and select “Device Manager.”
- Identify Problematic Drivers:
- Look for devices marked with a yellow triangle, which indicates a driver issue.
- Update the Driver:
- Right-click on the device and select “Update driver.”
- Choose “Search automatically for updated driver software.”
- Reinstall the Driver (if updating doesn’t work):
- Right-click the device and select “Uninstall device.”
- Restart your computer, and the drivers get installed by Windows automatically.
2. Check for Hardware Issues
Faulty hardware components, such as RAM, hard drives, or graphics cards, can cause BSOD errors. Here’s how to diagnose hardware issues:
- Run Memory Diagnostic Tool:
- Press Windows + R, type “mdsched.exe”, and press Enter.
- Select “Restart now and check for problems.”
- Test Your Hard Drive:
- Open Command Prompt as an administrator and type:
- Press Enter and restart your computer to allow the check to run.
- Check for Overheating:
- Use software like HWMonitor to monitor your CPU and GPU temperatures.
- Ensure your computer is properly ventilated and free from dust.
3. Run CHKDSK Utility
CHKDSK (Check Disk) is a built-in tool for detecting and fixing hard drive errors.
- Open Command Prompt as an administrator.
- Type the following command and press Enter:
- Confirm the scan and restart your computer.
CHKDSK will repair file system errors and recover bad sectors on your hard drive.
4. Use System File Checker (SFC)
The SFC tool scans and repairs corrupted system files.
- Open Command Prompt as an administrator.
- Type the following command and press Enter:
- Allow the scan to complete. If SFC finds issues, it will attempt to repair them automatically.
- Restart your computer.
This tool is particularly useful for resolving BSOD errors caused by corrupted system files.
When to Seek Professional Help
If you’ve tried all the solutions and your system continues to crash with a BSOD, it may be time to seek professional help. A certified technician can:
- Diagnose complex hardware issues.
- Repair or replace faulty components.
- Perform advanced system diagnostics and repairs.
Signs You Need Professional Help:
- Persistent BSODs despite troubleshooting.
- Strange noises from hardware components.
- Frequent system freezes or crashes.
- Note the Error Code: Use the error code to identify the cause.
- Update Drivers: Outdated or corrupted drivers can cause BSODs.
- Run System Scans:
- Use
sfc /scannowand DISM commands to check for corrupted files.
- Use
- Test Hardware: Use diagnostic tools to test RAM and hard drives.
- System Restore: Roll back recent updates or changes using System Restore.
How to Troubleshoot Display Issues Like Flickering Screens or Resolution Problems

Display problems can be disruptive. Here’s how to troubleshoot:
1. Check Physical Connections
- Ensure your monitor’s cable is securely connected to both the monitor and your device.
- Inspect for loose or damaged cables and replace them if necessary.
2. Update or Roll Back Display Drivers
On Windows
>> Update Display Drivers
- Press
Windows + Xand select Device Manager. - Expand the Display Adapters section.
- Right-click your graphics driver (e.g., Intel, NVIDIA, AMD) and select Update Driver.
- Choose Search automatically for updated driver software.
- Follow the on-screen instructions to complete the process.
>> Roll Back Display Drivers
- Open Device Manager (as above).
- Right-click the display adapter and select Properties.
- Navigate to the Driver tab and select Roll Back Driver (if the option is available).
- Follow the on-screen instructions to return to the previous driver version.
- Restart your system to apply changes.
On macOS
>> Update Display Drivers
- Access the Apple menu and choose System Settings (or System Preferences for older macOS versions).
- Go to Software Update.
- If an update for macOS or your display drivers is available, click Update Now.
- Follow the prompts to install the update.
>> Roll Back Display Drivers
- macOS does not support manual rollbacks for display drivers. Instead:
- Restore the system to a previous macOS version using Time Machine.
- Alternatively, reinstall the previous macOS version from recovery mode.
3. Adjust Screen Refresh Rate
On Windows
- Open Display Settings
- Right-click on your desktop and select Display settings.
- Navigate to Advanced Display Settings
- Scroll down and click on Advanced display settings.
- Select the Monitor
- If multiple monitors are connected, choose the one you want to adjust.
- Change the Refresh Rate
- Click on Display adapter properties for the chosen monitor.
- In the pop-up window, switch to the Monitor tab.
- Under Screen refresh rate, select the desired rate from the dropdown menu.
- Click Apply and then OK to save changes.
On macOS
- Open Display Settings
- Click the Apple menu and go to System Settings (or System Preferences in older versions).
- Select Displays.
- Select the Refresh Rate
- If your monitor supports different refresh rates, you’ll find an option to adjust it.
- Click on the Refresh Rate dropdown and choose the desired rate.
- Apply the Changes
- The refresh rate will adjust automatically once selected.
Note: The available refresh rates depend on your monitor and the graphics hardware. Always select the recommended rate for optimal performance and to avoid display issues.
4. Set Correct Resolution
- Ensure your screen resolution matches the recommended settings for your monitor.
- Go to display settings and select the resolution labeled as “Recommended.”
5. Test with a Different Monitor or Device
- Connect your computer to another monitor to determine if the issue is with the monitor or the system.
- Similarly, test the monitor with another device.
6. Inspect for Software Conflicts
- Disable recently installed software that might conflict with display settings.
- Start your system in safe mode to determine if the problem continues.
7. Hardware Check
- For persistent issues, verify if the monitor or graphics card is malfunctioning. Consider seeking professional help for repairs.
By following these steps, you can effectively troubleshoot and resolve common display issues, ensuring a smooth and uninterrupted viewing experience.
Conclusion
IT issues, whether minor or major, can disrupt your productivity and peace of mind. However, with a proactive approach and the right troubleshooting techniques, most problems can be resolved quickly and efficiently. From optimizing storage space and preventing overheating to fixing app crashes and addressing BSOD errors, these practical solutions empower you to take control of your tech.
Remember, regular maintenance, keeping your software updated, and staying informed about potential tech issues are key to ensuring a smooth and reliable computing experience. By implementing these strategies, you can minimize disruptions, enhance performance, and keep your devices running at their best.
Let’s simplify IT together—one solution at a time!
Read the Part 1 of this blog here,
Leave a Reply