

Introduction: Why IT Management Needs Microsoft 365 Admin Center

In today’s fast-paced digital environment, IT management is the backbone of organizational success. For companies leveraging cloud-based productivity solutions like Microsoft 365, staying on top of user management, security, and overall system performance is crucial. Enter the Microsoft 365 Admin Center—a comprehensive platform designed to help IT administrators manage their organization’s Microsoft 365 environment with precision and ease.
Whether you’re a seasoned IT professional or just starting out, mastering the Microsoft 365 Admin Center can unlock new levels of efficiency, productivity, and security for your organization. Let’s dive deep into the tools, features, and best practices that will help you maximize your IT management potential.
What Is Microsoft 365 Admin Center?
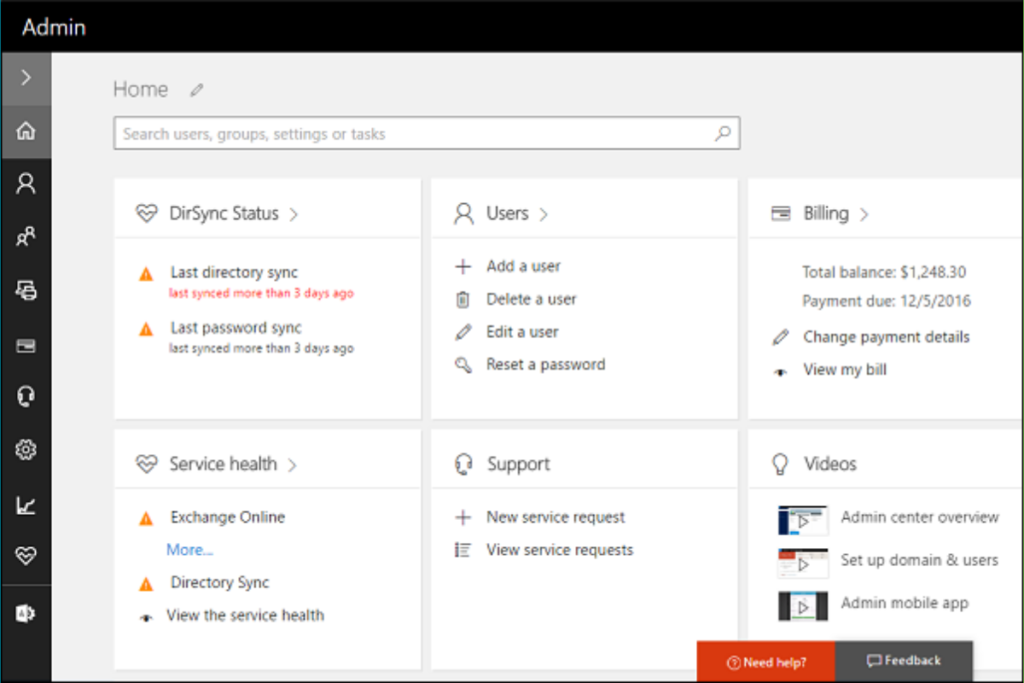
The Microsoft 365 Admin Center is a centralized web-based interface that allows IT administrators to manage Microsoft 365 services, users, and devices. It serves as the control hub for all Microsoft 365 applications, including Exchange, SharePoint, Teams, and OneDrive, ensuring that organizations can manage their IT infrastructure from one location.
Key Features of Microsoft 365 Admin Center:
- User and Group Management:
Add, modify, or remove users and manage permissions with just a few clicks. - License Management:
Allocate, reassign, or revoke Microsoft 365 licenses across the organization. - Security and Compliance Tools:
Monitor and manage security settings, set up policies, and ensure compliance with industry standards. - Service Health Monitoring:
Track the status of Microsoft 365 services and receive alerts on outages or performance issues. - Customizable Dashboards:
Get a comprehensive view of key metrics and alerts tailored to your organization’s needs.
Why It Matters:
A centralized admin center simplifies IT management, reduces administrative overhead, and provides real-time insights into system performance and security.
Setting Up the Microsoft 365 Admin Center: A Step-by-Step Guide
Before you can fully utilize the Microsoft 365 Admin Center, it’s essential to set it up correctly. Here’s a step-by-step process to help you.
Step 1: Access the Admin Center
- Navigate to admin.microsoft.com.
- Log in using the admin credentials linked to your organization’s Microsoft 365 account.
Step 2: Configure Admin Roles
Assign roles based on responsibilities to ensure proper access control:
- Global Administrator: Full access to all features.
- User Administrator: Manages users and groups.
- Billing Administrator: Handles subscriptions and billing.
- Compliance Administrator: Manages security and compliance settings.
How to assign Admin role to a user
>> Access the Microsoft 365 Admin Center:
- Open your preferred web browser and navigate to the Microsoft 365 Admin Center,
admin.microsoft.com. - Sign in using your Global Administrator credentials.
>> Navigate to the Active Users Page:
- In the left-hand navigation menu, click on Users.
- Select Active Users from the dropdown menu.
Once inside the Admin Center, you’ll see a list of all active users within your organization.
>> Select the User to Assign an Admin Role:
- Find and select the user you wish to assign an admin role to.
- Click on the user’s name to open their profile settings.
>> Assign an Admin Role:
- In the selected user’s profile, scroll down to the Roles section and click on Manage Roles.
- Choose one of the following roles based on the user’s responsibilities:Common Admin Roles:
- Global Administrator: Grants full access to all administrative features in Microsoft 365.
- User Administrator: Can manage user accounts, groups, and licenses.
- Billing Administrator: Manages subscriptions and billing information.
- Exchange Administrator: Manages mailboxes, distribution groups, and mail flow settings.
- SharePoint Administrator: Oversees SharePoint sites, document libraries, and settings.
- Teams Administrator: Manages Teams settings, policies, and configurations.
- Security Administrator: Manages security policies and monitors threat management.
- Confirm your selection to grant the user the permissions associated with the assigned role(s).
>> Save the Changes:
- After selecting the roles, click Save changes.
-
Best Practices for Assigning Admin Roles
- Use the Principle of Least Privilege:
Assign only the permissions necessary for the user to perform their tasks. Avoid giving unnecessary access to reduce security risks. - Regularly Review Admin Roles:
Periodically review the list of admin roles to ensure that only authorized personnel have access to administrative functions. - Enable Multi-Factor Authentication (MFA) for Admin Accounts:
Protect admin accounts by enabling MFA to add an extra layer of security. - Document Role Assignments:
Maintain a record of who holds which roles and their specific responsibilities to streamline future audits and role management.
Step 3: Add Users and Groups
How to add new users
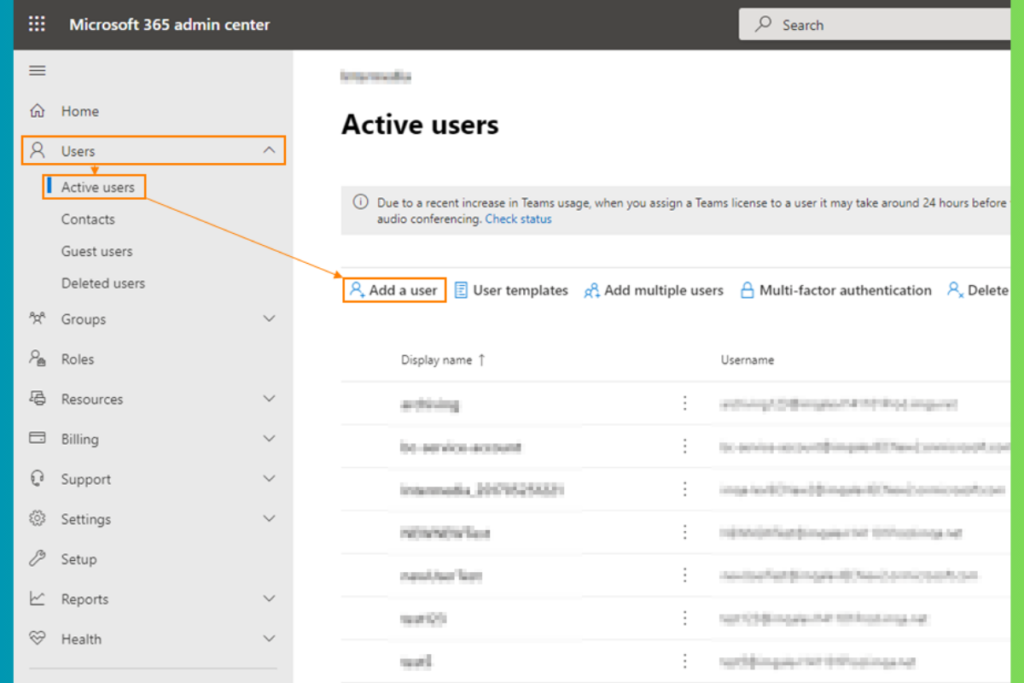
Go to the Admin Center and proceed to the Active Users section.
- From the left-hand menu, click on Users.
- Select Active Users from the dropdown menu.
This will display a comprehensive list of all users currently active within your organization.
>> Add a New User:
- On the Active Users page, click the + Add a User button located at the top of the screen.
This will open the Add a user form.
>> Fill in User Information:
- Basic Information:
- First Name: Enter the user’s first name.
- Last Name: Enter the user’s last name.
- Display Name: This is automatically generated but can be edited.
- Username: Create the user’s sign-in name, which will also serve as their email address (e.g., johndoe@yourcompany.com).
Note: The domain (e.g., @yourcompany.com) will be pre-filled, but you can change it if necessary.
- Password Settings:
- You can either generate an automatic password or create a custom password.
- Decide if the user should be prompted to reset their password during their first sign-in.
- Select the option to send the password to an email address (e.g., HR or the manager) if needed.
>> Assign Licenses:
- In the Product Licenses section, select the appropriate license for the new user based on their role.
Example licenses:- Microsoft 365 Business Basic
- Microsoft 365 Business Standard
- Microsoft 365 E3
- If you do not assign a license, the user will have limited access to Microsoft 365 services (e.g., no email, Teams, or OneDrive).
>> Assign Roles (Optional):
- In the Roles section, you can assign an administrative role if the user needs elevated permissions.
- Common roles include:
- Global Administrator: Full control over all Microsoft 365 features.
- User Administrator: Manages users and groups.
- Billing Administrator: Handles subscriptions and billing.
Tip: If the user does not need administrative privileges, leave the role as User (no admin access).
>> Configure Settings (Optional):
- Within the Settings section, you have the flexibility to adjust user-specific preferences, such as:
- Location: Set the user’s geographical location (e.g., United States).
- Department: Enter the department the user belongs to (e.g., Sales, IT).
- Job Title: Provide the user’s job title if applicable.
>> Review and Finish:
- Review the user information to ensure all details are correct.
- Click Add to create the new user account.
Once the account is created, a confirmation message will appear, and you’ll have the option to:
- Send account details to the user’s manager or team.
- Print account details for onboarding purposes.
>> Verify the New User:
- Go back to the Active Users page to verify that the new user has been added.
- You can now manage their account, assign additional permissions, or monitor their activity as needed.
Best Practices for Adding Users
- Use Group-Based License Assignment:
For larger organizations, consider using groups to automate license assignments and permissions based on department or role. - Enable Multi-Factor Authentication (MFA):
After adding the user, require MFA to enhance security for their account. - Provide Training Resources:
Ensure new users receive proper training on using Microsoft 365 apps like Outlook, Teams, and OneDrive to maximize productivity. - Set Up Password Policies:
Encourage users to set a strong password and update it regularly to maintain account security.
How to create groups
From the MS 365 Admin Center,
- In the left-hand navigation pane, click Groups.
- To explore existing groups, choose Active Groups from the dropdown menu.
- Click the + Add a group button to start creating a new group.
>> Choose the Type of Group:
Microsoft 365 offers several types of groups to meet different collaboration needs:
- Microsoft 365 Group (Recommended)
- Provides a shared mailbox, calendar, file storage (via SharePoint), and integration with Microsoft Teams.
- This option is perfect for teams that require a centralized space for seamless collaboration.
- Security Group
- Used to manage user permissions and access to resources such as SharePoint sites or applications.
- Does not offer collaboration features like shared mailboxes or calendars.
- Distribution List (Distribution Group)
- Sends emails to all group members.
- Does not have a shared mailbox or other collaboration tools.
- Mail-enabled Security Group
- Combines the features of a security group with email distribution capabilities.
- Shared Mailbox
- Provides a mailbox that multiple users can access to send and receive emails.
- Shared mailbox is ideal for managing a shared email address, like info@company.com, that would be used by multiple team members at the same time.
Tip: For most collaboration needs, the Microsoft 365 Group is the best choice.
>> Configure Group Details:
- Select a Group Type:
Choose the group type that best fits your needs and click Next. - Group Name:
- Enter a descriptive name for the group (e.g., Marketing Team, IT Support).
- This name will appear in the address book and in Microsoft Teams if you integrate the group.
- Email Address:
- A corresponding email address for the group will be generated based on the group name.
- You can also modify the email address as needed (e.g., marketing@yourcompany.com).
- Description (Optional):
- Add a brief description to explain the group’s purpose (e.g., “This group manages all marketing-related tasks and communications”).
>> Set Privacy Options:
- Privacy Settings:
- Public: Anyone in the organization can join the group and access its content.
- Private: Only approved members can join and view the group’s content (recommended for most groups).
- Microsoft Teams Integration:
If you selected a Microsoft 365 Group, you’ll have the option to enable a Microsoft Teams channel for the group. This allows members to collaborate in real-time.
>> Add Members to the Group:
- Add Members:
-
- After creating the group, you can add additional members as needed to keep the group dynamic and up to date.
-
- Assign Group Owners:
- Group owners have administrative control over the group, including adding or removing members and managing settings.
- For efficient management and to ensure redundancy, it’s advisable to assign at least two owners to the group.
>> Review and Create the Group:
- Review the group details to ensure everything is set up correctly.
- Click Create Group to finalize the process.
- Once created, the group will appear in the Active groups list.
>> Manage the Group (Optional):
- Modify Group Settings:
After the group is created, you can manage its settings by selecting the group from the Active groups list. - Add or Remove Members:
- Navigate to the group’s details page and click Members to add or remove users.
- Configure Group Settings:
- Set up additional options such as email delivery management, permissions, and group expiration policies.
Best Practices for Creating Groups in Microsoft 365
- Use Consistent Naming Conventions:
Establish a standard naming convention for groups to make them easier to find and manage. For example:- Department-Function (e.g., IT-Support, HR-Recruitment).
- Assign Multiple Group Owners:
Ensure that each group has at least two owners to avoid management bottlenecks if one owner is unavailable. - Review Group Membership Regularly:
Periodically review group membership to remove inactive or unauthorized users. - Integrate with Microsoft Teams:
For collaboration-heavy teams, integrating groups with Microsoft Teams can streamline communication and project management. - Leverage Security Groups for Permissions:
Use security groups to control access to sensitive resources like SharePoint sites, folders, or applications.
Step 4: Customize Security Settings
- Navigate to Security & Compliance and configure:
- Multi-Factor Authentication (MFA)
- Conditional Access Policies
- Data Loss Prevention (DLP) Policies
Proper setup ensures your organization’s IT environment is secure, compliant, and ready for productivity.

Best Practices for Security:
- Enable MFA for All Users:
This is crucial to add an additional layer of security, thereby reducing the risk of unauthorized access. - Regularly Review Security Alerts:
Monitor the Microsoft Secure Score to assess and improve your organization’s security posture. - Implement Conditional Access:
Use conditional access policies to enforce location-based access restrictions.
To know more about setting up MFA, check out, Enable Secure Multi-Factor Authentication in Microsoft 365 in 5 simple steps
To read more about setting up Conditional Access Policies in Microsoft 365, read, How to Set Up Conditional Access Policies in Microsoft 365
Mastering User and License Management
Effective user and license management is critical to optimizing Microsoft 365 costs and ensuring that users have the necessary tools to perform their tasks.
License Management Best Practices:
- Regular Audits:
Periodically review assigned licenses to ensure they match user roles and requirements. - Automate License Allocation:
Use PowerShell scripts to automate license assignments and streamline user onboarding. - Optimize License Usage:
Identify underused licenses and reassign them to maximize ROI.
Well planned user and license management can result in substantial cost savings and improved user productivity.
Visit here to check the Microsoft 365 Business plans.
Monitoring and Reporting: Keeping Tabs on Performance
The Microsoft 365 Admin Center offers a variety of reporting tools that provide insights into system performance, user activity, and security events.
Essential Reports:
- Usage Reports:
Monitor how users are engaging with Microsoft 365 applications like Teams, OneDrive, and SharePoint. - Security Reports:
Recognize potential threats and monitor compliance with security policies. - Service Health Reports:
Stay informed about the status of Microsoft 365 services and planned maintenance.
Customizing Reports:
- Use Power BI to create custom dashboards that provide a real-time view of key metrics.
- Schedule automated reports to ensure stakeholders receive timely updates.
Benefits of Monitoring and Reporting:
- Improved Decision-Making:
Data-driven insights help you make informed decisions about IT infrastructure. - Proactive Issue Resolution:
This helps in identifying and addressing potential issues before they burst into major problems.
Optimizing Microsoft 365 Performance for Maximum Efficiency
The Microsoft 365 Admin Center isn’t just about managing users and licenses; it’s also a powerful tool to optimize performance across your organization’s IT infrastructure. By fine-tuning various settings, you can ensure your Microsoft 365 environment operates at peak efficiency.
Performance Optimization Tips:
1. Streamline Communication Tools
- Microsoft Teams:
Configure Teams settings to ensure seamless collaboration and communication.- Limit the number of unnecessary teams and channels.
- Encourage using shared files in Teams to reduce redundant data storage.
- Email Management (Exchange Online):
- Set mailbox quotas to prevent excessive data storage.
- Use email retention policies to automatically archive or delete old emails.
2. Optimize Storage Usage
Storage is often a bottleneck for IT systems. Efficient storage management in OneDrive and SharePoint can prevent slowdowns.
- OneDrive:
Set up Known Folder Move (KFM) to redirect common folders (Desktop, Documents, Pictures) to OneDrive, ensuring critical data is backed up and accessible from anywhere. - SharePoint:
- Periodical audit of large files and unused sites helps to free up storage in the organization.
- Implement version control policies to prevent unnecessary storage bloat.
3. Automate Repetitive Tasks
Automation can save time and improve system efficiency.
- Use Power Automate to create workflows that automate repetitive tasks like user provisioning, notifications, and data transfers.
- Automate license reassignments based on user roles and department changes.
Integrating Third-Party Apps for Enhanced Functionality

Microsoft 365 is a robust platform on its own, but it truly shines when integrated with third-party applications. The Microsoft 365 Admin Center allows seamless integration with a wide range of apps to enhance productivity, collaboration, and security.
Popular Third-Party Integrations:
- Project Management Tools:
- Trello and Asana for task and project management.
- Integrate with Teams for real-time updates and notifications.
- Cloud Storage Services:
- Dropbox and Google Drive can be connected to streamline file sharing across platforms.
- Use the Microsoft 365 admin center to manage permissions and monitor data transfers.
- Security Solutions:
- Add-on services like Okta for identity management and Cloud App Security for enhanced threat detection.
How to Integrate Third-Party Apps:
- Navigate to Settings > Services & Add-ins in the Admin Center.
- Select the app you wish to integrate and follow the configuration prompts.
- Assign permissions and verify the integration for security compliance.
Integrating the right apps can expand the functionality of Microsoft 365 and tailor it to your organization’s unique needs.
Leveraging Microsoft 365 Admin Center for Remote Work
Remote work is here to stay, and managing a distributed workforce poses unique challenges for IT administrators. The Microsoft 365 Admin Center offers several features designed to support remote teams.
Key Tools for Remote Work Management:
1. Device Management with Intune
- Microsoft Intune allows you to manage and secure employee devices remotely.
- Enforce security policies, deploy software updates, and remotely wipe lost or compromised devices.
2. Collaboration Tools
- Microsoft Teams can be utilized as the central hub for remote collaboration for small or large organizations.
- Manage Teams policies to control guest access, meeting settings, and data sharing.
- Set up break-out rooms for virtual brainstorming sessions.
3. Access Control
- Implement Conditional Access policies to grant or restrict access based on user location, device type, and risk assessment.
- Enforce Multi-Factor Authentication (MFA) for secure access to Microsoft 365 applications from remote locations.
Best Practices for Managing Remote Teams:
- Regularly monitor user activity and performance through usage analytics.
- Ensure employees have access to necessary training resources for remote tools like Teams, OneDrive, and SharePoint.
- Encourage secure file sharing and communication to maintain data integrity and confidentiality.
By leveraging these tools, you can create a seamless and secure remote work environment that keeps employees productive and engaged.
Managing Compliance and Governance
Compliance is a critical aspect of IT management, especially in industries with strict regulatory requirements. The Microsoft 365 Admin Center offers several built-in tools to help organizations maintain compliance and implement governance policies.
Key Compliance Features:
1. Compliance Manager
- A comprehensive tool that provides a compliance score based on your organization’s adherence to regulatory standards like GDPR, HIPAA, and ISO 27001.
- Use the recommendations provided by Compliance Manager to improve your compliance posture.
2. Data Loss Prevention (DLP)
- DLP policies can be used to prevent sensitive information from being shared outside the organization.
- Create custom DLP rules to monitor and restrict the sharing of personally identifiable information (PII), financial data, and intellectual property.
3. eDiscovery
- The eDiscovery tool allows you to search, hold, and export data for legal and regulatory purposes.
- Use it to respond to legal requests and ensure data is retained in accordance with compliance requirements.
Governance Best Practices:
- Periodically review and upgrade compliance policies to line up with upcoming regulations.
- Teach employees about the importance of compliance and data governance.
- Use audit logs to track and document compliance-related activities.
Proper compliance management ensures your organization avoids legal penalties and maintains customer trust.
Future-Proofing Your IT Management with Microsoft 365
Technology evolves rapidly, and IT administrators must stay ahead of the curve to ensure their organization remains competitive. The Microsoft 365 Admin Center is continually updated with new features and enhancements to meet the changing needs of businesses.
Staying Updated:
- Subscribe to the Microsoft 365 Roadmap to stay informed about upcoming features and updates.
- Participate in the Microsoft Insider Program to gain early access to new features and provide feedback.
Training and Certification:
- Encourage IT staff to pursue Microsoft certifications like Microsoft 365 Certified: Enterprise Administrator Expert.
- Access free training resources through Microsoft Learn to stay updated on best practices and new features.
By future-proofing your IT management strategy, you can ensure your organization remains agile, secure, and productive in an ever-changing digital landscape.
Conclusion
Mastering the Microsoft 365 Admin Center is essential for any IT administrator looking to optimize their organization’s IT infrastructure. From user and license management to security, compliance, and performance optimization, the Admin Center offers a comprehensive suite of tools to enhance productivity, streamline operations, and secure critical data.
By implementing the strategies and best practices outlined in this guide, you can unlock the full potential of Microsoft 365 and position your organization for long-term success.
FAQs
1. What is the Microsoft 365 Admin Center?
The Microsoft 365 Admin Center is a web-based interface that allows IT administrators to manage users, licenses, security settings, and services across their organization’s Microsoft 365 environment.
2. How can I access the Microsoft 365 Admin Center?
You can access the Admin Center by navigating to admin.microsoft.com and signing in with your admin credentials.
3. What are the best practices for securing Microsoft 365?
Enable Multi-Factor Authentication (MFA), implement Conditional Access policies, regularly review security reports, and monitor the Microsoft Secure Score to improve security.
4. Can I automate tasks in the Microsoft 365 Admin Center?
Yes, you can use Power Automate and PowerShell scripts to automate repetitive tasks like user provisioning, license assignments, and data transfers.
5. How do I monitor the performance of Microsoft 365 services?
Use the built-in service health reports and create custom dashboards with Power BI to monitor the performance and status of Microsoft 365 services.
Check out LinkedIn article here.
Leave a Reply