Notes:
- Testing: Test the changes thoroughly to ensure legitimate users are not impacted.
- Whitelist Trusted IPs: Always whitelist your organization’s trusted IPs to prevent accidental blocking.
- Monitoring: Use logs and reports in the Microsoft 365 Defender Portal to monitor blocked traffic.
By following these steps, you can effectively block unwanted IPs and secure your organization against potential threats.
How to Block/Unblock an email address or domain
Blocking or unblocking a domain or email address in Microsoft 365 can help you manage unwanted or suspicious emails. You can achieve this through the Microsoft 365 Defender portal by creating anti-spam policies. Here’s how:
How to Block/Allow a Domain or Email Address
Method 1: Using Anti-Spam Policies
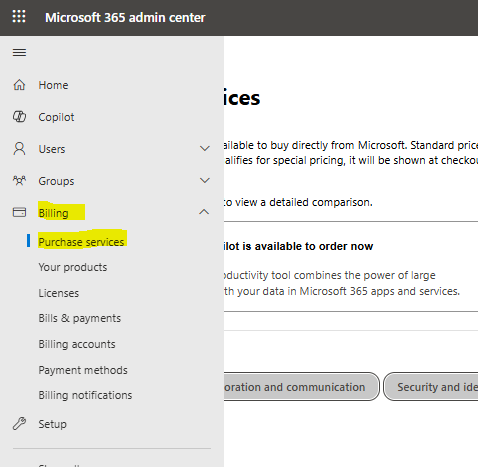
>> In the left menu, select Email & Collaboration > Policies & Rules > Threat policies.
>> Under Policies, select Anti-spam.
- Edit or Create a Custom Spam Filter Policy:
>> Either edit the Default policy or create a new custom policy by clicking Create policy > Inbound.
- Block a Domain or Email Address:
>> Under the Allow/Block List, find the Blocked Senders and Domains section.
>> Add the domain (e.g., example.com) or email address (e.g., spammer@example.com) to the Blocked Senders and Domains list.
>> Click Save to implement the changes.
Method 2: Using the Blocked/Allowed Senders List in Microsoft Outlook
For individual users, they can block or unblock domains or email addresses via Outlook:
Blocking an Email Address in Outlook:
- Open Outlook (web or desktop).
- Select the email message you wish to block.
- Click Junk > Block in the toolbar (or right-click the email and select Junk > Block Sender).
- Confirm the action to block the sender.
Unblocking an Email Address in Outlook:
- Open Outlook (web or desktop).
- Go to Settings (gear icon) > View all Outlook settings.
- Navigate to Mail > Junk email.
- Remove the email address or domain from the Blocked senders and domains list.
- Save changes.
Notes:
- Blocked Emails Behavior: Emails from blocked domains or addresses are sent to the Junk Email folder or rejected outright.
- Scope:
- Changes made in anti-spam policies affect the organization.
- Changes in Outlook settings affect only the individual user.
- Monitoring: Use the Microsoft 365 Defender portal for email tracing and monitoring to ensure legitimate emails are not incorrectly blocked.
These steps allow you to effectively manage email filtering for both individual users and your organization as a whole.
Conditional Access Policies in MS 365
In Microsoft 365, Conditional Access Policies let you control access to your organization’s resources based on specific conditions.. They enable administrators to enforce security requirements while providing flexibility for users.
Key Features of Conditional Access Policies
-
- Enforce access requirements such as multi-factor authentication (MFA) or device compliance.
- Block or allow access based on conditions like user location, device type, or application.
- Conditions:
-
- User or Group: Apply policies to specific users, groups, or roles.
- Applications: Restrict access to specific apps like Exchange Online, SharePoint, or Teams.
- Location: Allow or block access based on IP or geographical location.
- Device Compliance: Require that devices meet compliance standards before granting access.
- Risk Levels: Use Azure AD Identity Protection to base conditions on user or sign-in risk.
- Actions:
- Grant access under specific conditions (e.g., require MFA).
- Block access entirely.
How to Use Conditional Access Policies
>> Ensure you have an Azure Active Directory Premium P1 or P2 license, as Conditional Access is part of Azure AD.
>> You need global admin or security admin permissions to configure policies.
- Access the Azure Active Directory Admin Center
>> Go to Azure Portal.
>> Go to Azure Active Directory > Security > Conditional Access.
>> Select New Policy: Give the policy a meaningful name (e.g., “Require MFA for External Users”).
>> Under Assignments > Users and groups, specify who the policy applies to (e.g., all users or a specific group).
>> Optionally, exclude certain users (e.g., administrators).
- Select Cloud Apps or Actions:
>> Under Cloud apps or actions, specify the apps to which the policy applies (e.g., Microsoft Teams, SharePoint, or “All apps”).
>> Under Conditions, set criteria for applying the policy:
-
- Sign-in risk: Low, medium, or high risk (requires Identity Protection).
- Device platforms: Windows, macOS, iOS, Android.
- Locations: Apply the policy based on trusted or untrusted locations.
- Client apps: Control access based on app types (e.g., mobile apps, web browsers).
- Set Access Controls:
>> Under Access controls > Grant, define requirements such as:
-
-
-
- Require MFA.
- Require compliant or hybrid Azure AD-joined devices.
- Require terms of use acceptance.
>> Alternatively, under Block access, prevent access entirely.
>> Toggle the Enable policy switch to On.
>> Save the policy.
>> Always test new policies with a small group of users to avoid locking out legitimate users.
>> Go to Azure AD Sign-ins to monitor how the policy affects user sign-ins and adjust as needed.
Examples of Conditional Access Policies in Microsoft 365
1. Require Multi-Factor Authentication (MFA) for All Users
- Scenario: Increase security for all users by requiring MFA during sign-in.
- Conditions:
- Users: All users.
- Applications: All cloud apps.
- Locations: Exclude trusted IP ranges (e.g., your corporate network).
- Access Control:
- Grant access but require MFA.
- Use Case:
- Prevent unauthorized access by adding an additional layer of authentication.
2. Block Access from Risky Locations
- Scenario: When access should be blocked from countries or regions where your organization isn’t active.
- Conditions:
- Users: All users or a specific group (e.g., contractors).
- Locations: Untrusted or high-risk locations (e.g., geo-blocking countries).
- Access Control:
- Use Case:
- Mitigate the risk of unauthorized access or attacks originating from specific regions.
3. Restrict Access to Managed Devices
- Scenario: Ensure only devices compliant with your organization’s policies can access sensitive data.
- Conditions:
- Users: All users or specific groups (e.g., finance team).
- Device Compliance: Require devices to be compliant with Intune policies.
- Access Control:
- Grant access but require device compliance.
- Use Case:
- Protect sensitive files and applications by restricting access to managed and secure devices.
4. Enforce MFA for High-Risk Sign-Ins
- Scenario: Apply stricter security measures for sign-ins detected as risky by Azure AD Identity Protection.
- Conditions:
- Sign-in Risk: Medium or high risk.
- Users: All users.
- Access Control:
- Grant access but require MFA.
- Use Case:
- Enhance security for accounts at risk of being compromised.
5. Block Legacy Authentication
- Scenario: Prevent the use of outdated authentication protocols (e.g., IMAP, POP) that do not support MFA.
- Conditions:
- Users: All users or specific groups.
- Client Apps: Select “Other clients” to target legacy protocols.
- Access Control:
- Use Case:
- Reduce vulnerabilities by eliminating access via insecure protocols.
6. Require MFA for Administrators
- Scenario: Secure privileged accounts by enforcing MFA.
- Conditions:
- Users: Directory roles (e.g., Global Administrators, Exchange Admins).
- Applications: All cloud apps.
- Locations: Exclude trusted IPs if necessary.
- Access Control:
- Grant access but require MFA.
- Use Case:
- Protect sensitive admin accounts from unauthorized access.
7. Limit Access to Specific Applications
- Scenario: Restrict access to critical applications (e.g., Salesforce, HR systems) to specific users.
- Conditions:
- Users: HR or finance team members.
- Applications: Select specific apps (e.g., Workday, Salesforce).
- Access Control:
- Grant access but require MFA.
- Use Case:
- Ensure only authorized users access sensitive applications.
8. Allow Access Only During Working Hours
- Scenario: Restrict access to corporate resources outside business hours.
- Conditions:
- Users: All users or specific groups.
- Sign-in Risk: Low risk.
- Locations: Trusted locations only.
- Access Control:
- Grant access only within specified hours.
- Use Case:
- Minimize security risks from off-hours access attempts.
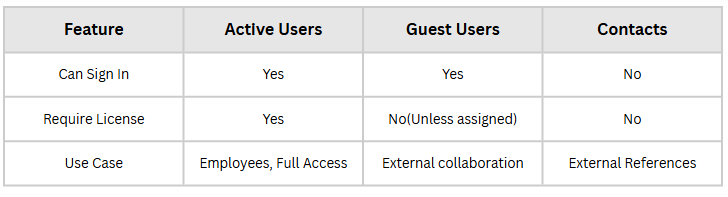
9. Enforce Terms of Use for External Users
- Scenario: Require external users to accept a Terms of Use agreement before accessing shared resources.
- Conditions:
- Users: Guest or external users.
- Applications: SharePoint Online, Teams.
- Access Control:
- Grant access but require Terms of Use acceptance.
- Use Case:
- Ensure external collaborators acknowledge compliance requirements.
10. Block Access to Corporate Apps from Untrusted Networks
- Scenario: Allow access only from trusted corporate networks.
- Conditions:
- Users: All users.
- Locations: Trusted IP addresses only.
- Access Control:
- Block access for untrusted locations.
- Use Case:
- Prevent unauthorized access from unapproved networks.
11. Require Compliance for BYOD (Bring Your Own Device)
- Scenario: Allow users to access corporate apps from personal devices only if they meet security requirements.
- Conditions:
- Users: All users or specific groups.
- Device Compliance: Require Intune compliance.
- Access Control:
- Grant access but require compliant devices.
- Use Case:
- Ensure personal devices used for work comply with company security standards.
These examples show how Conditional Access can help secure your Microsoft 365 environment while maintaining user productivity and flexibility.
Best Practices for Conditional Access
- Start with report-only mode to evaluate the impact of policies before enforcing them.
- Use named locations to define trusted IP ranges or geographic regions.
- Combine Conditional Access with Identity Protection for risk-based access decisions.
- Regularly review and update policies based on evolving threats and organizational needs.
Conditional Access is a powerful tool for balancing security and user productivity in Microsoft 365.
Read more on How to Set Up Conditional Access Policies in Microsoft 365
Conclusion
The MS 365 Admin Center is a powerful hub for managing your organization’s resources, users, and security configurations. By understanding its various features and functionalities—such as purchasing services, creating groups, and enforcing security policies—you can streamline operations and enhance collaboration. With this guide as your reference, you can confidently manage your Microsoft 365 environment, ensuring it meets your organization’s dynamic needs while staying secure and efficient.


Leave a Reply